Summary
PsExec is a tool developed by Mark Russinovich that can be used to execute applications on remote systems. This post’s purpose is to give details about the inner workings of PsExec for research purposes only. This is not an extensive analysis of every argument that PsExec uses, and we only provide details about the general usage of the tool. The idea of Reverse Engineering PsExec was initially proposed in the following tweet: https://twitter.com/DebugPrivilege/status/1512851119688531976.
Disclaimer: Our approach is not intended to break the Sysinternals Software License mentioned at https://docs.microsoft.com/en-us/sysinternals/license-terms. The binary was not decompiled using IDA Pro (disassembled code only).
Analyst: @GeeksCyber
Technical analysis
SHA256: 3B08535B4ADD194F5661E1131C8E81AF373CA322CF669674CF1272095E5CAB95
The blog post is split into two parts. The first part presents a situation where PsExec is running on a remote machine specified by a computer name or an IP address.
First process: psexec.exe \\192.168.164.130 -u test -p test -h cmd.exe
The GetModuleFileNameW API is utilized to retrieve the path of the executable:

The process extracts version information size for PsExec by calling the GetFileVersionInfoSizeW routine:

The version information for PsExec is copied to a buffer using GetFileVersionInfoW:

The translation array is retrieved from the version-information resource:

The InternalName string is extracted by calling the VerQueryValueW function (see figure 5). 040904B0 is a combination of 0x409 (English – United States language) and 0x4B0 (UTF_16).

A similar approach is used to extract FileVersion, FileDescription, LegalCopyright, and CompanyName.
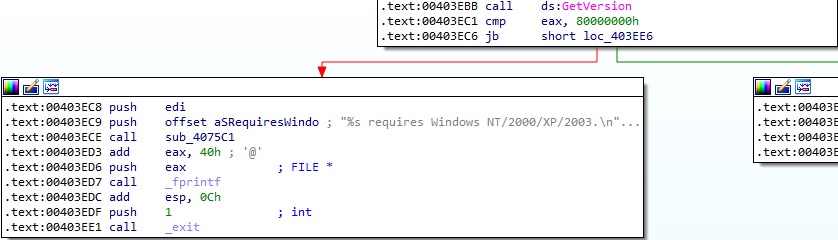
There is a function call to GetVersion, and the return value is expected to be < 0x80000000; otherwise, it prints the “PsExec requires Windows NT/2000/XP/2003.” message:
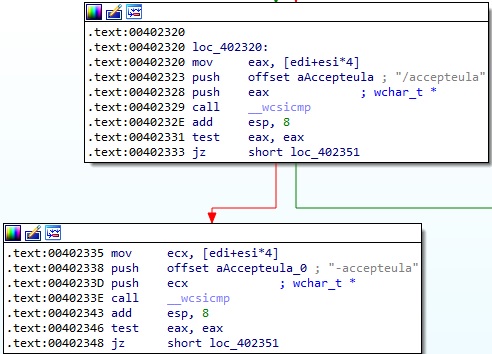
The file performs a comparison between the command line arguments and “/accepteula” (or “-accepteula”):
RegCreateKeyW is utilized to create the “Software\Sysinternals\PsExec” registry key (0x8000001 = HKEY_CURRENT_USER):

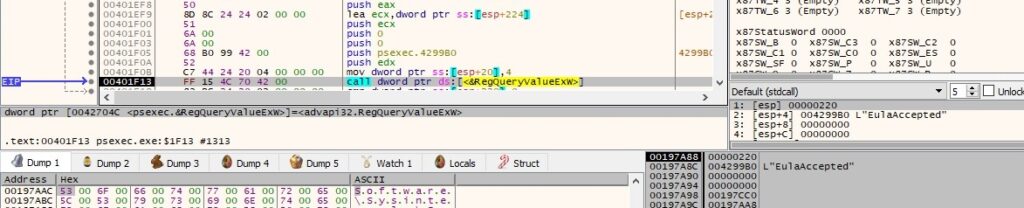
The PsExec executable is looking for a registry value called “EulaAccepted”, which determines whether the user has accepted the EULA (License Agreement):
The executable loads the “Riched32.dll” module into the address space of the process:

The DialogBoxIndirectParamW routine is utilized to create a modal dialog box based on a dialog box template:

The text of the window’s title bar is changed to “PsExec License Agreement” by calling the SetWindowTextW API:

The binary obtains a handle to a control in the dialog box created above using GetDlgItem:

The process sends the TTM_GETTOOLINFO (0x435) message to the window in order to get the current tooltip definition:

The anchor highlight setting for the window’s toolbar is set by sending the TB_SETANCHORHIGHLIGHT (0x449) message to the window:

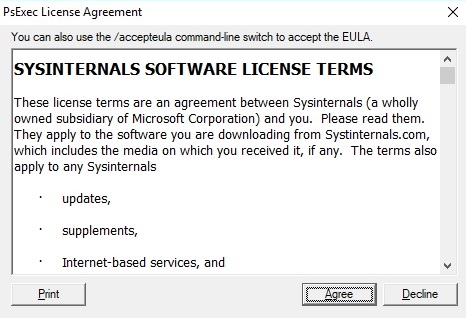
The PsExec License Agreement window appears on the screen, and we need to accept the terms in order to continue the execution:
The PsExec executable destroys the modal dialog box created earlier using EndDialog:

RegSetValueExW is used to set the value of the “EulaAccepted” registry value to 1:

The binary extracts the NetBIOS name of the local computer via a function call to GetComputerNameW:

There is a second (redundant) call to GetVersion; however, a different message is printed this time:
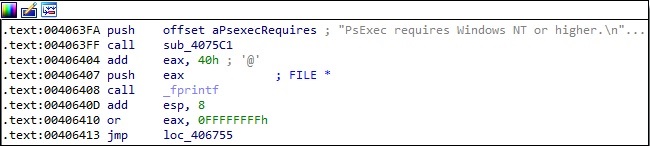
For example, if an argument is too long, then PsExec displays a message that contains a typo:

The executable retrieves the command-line string for the process by calling the GetCommandLineW routine:

GetFullPathNameW is used to extract the full path and file name of PsExec:

The file retrieves the address of “CreateRestrictedToken” and other export functions via a call to GetProcAddress:

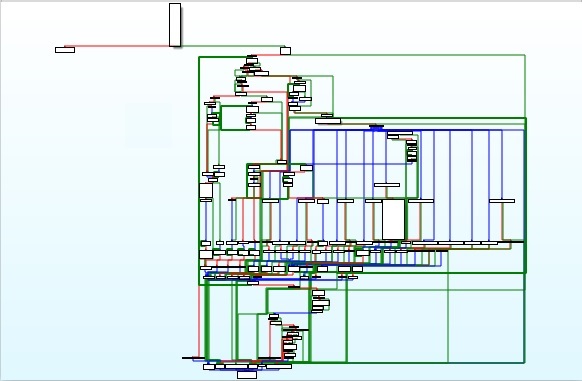
The function that contains the switch statement, which chooses an execution flow depending on the command line arguments, is shown below (IDA Pro graph):
Firstly, every argument that starts with “-” is compared with “accepteula”, “low”, “belownormal”, “normal”, “abovenormal”, “high”, “realtime”, and “background”.
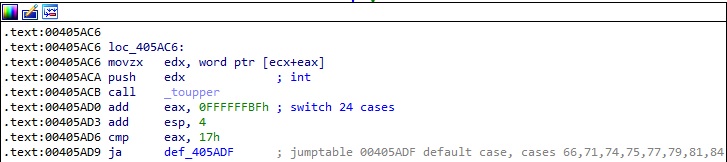
Every argument that starts with “-” is converted to uppercase using _toupper. The 0xFFFFFFBF constant is added to the return value, and then the result is supposed to be between 0x0 and 0x17 (23 in decimal). Just based on this simple calculus, the “-y” and “-z” arguments couldn’t be valid:
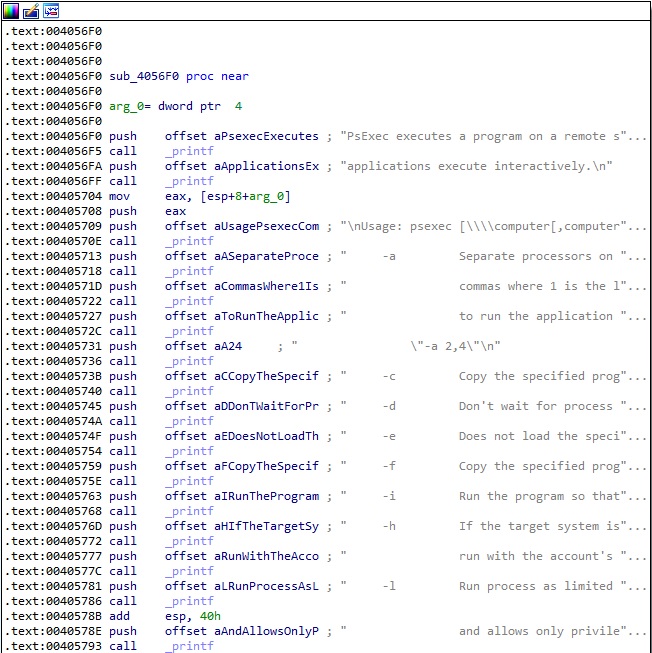
In the case of invalid parameters, the process prints out the instructions for parameters:
There is a comparison between the local computer name and the computer name\IP address passed as a parameter:

The NetIsServiceAccount function is used to test whether the user name passed as a parameter exists in the Netlogon store on the local machine:

The executable creates an unnamed event object by calling the CreateEventW API:

A new function is added to the list of handler functions for the current process:

An intermediary message that gives details about what action will occur next is displayed (these messages aren’t visible during normal execution because they’re deleted after the action is complete):

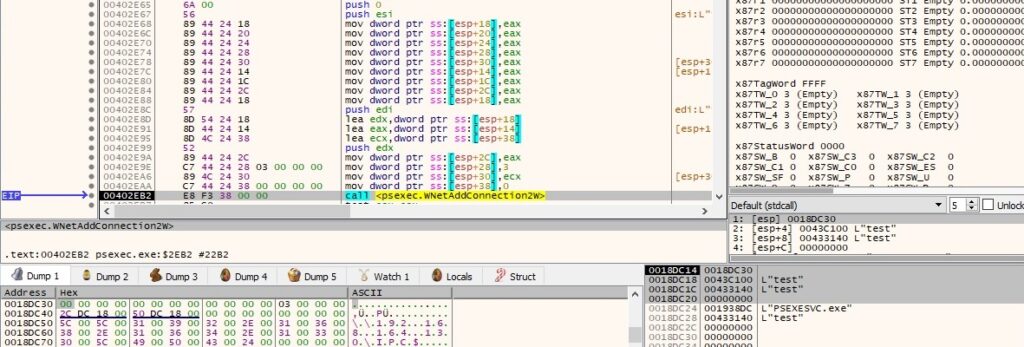
The PsExec process makes a connection to the IPC$ share on the remote machine using the WNetAddConnection2W API. The credentials passed as parameters must be valid on the remote host:
The binary determines the location of a resource called “PSEXESVC” via a function call to FindResourceW:

The resource is loaded in memory, and a pointer to the specified resource in memory is retrieved by calling the following functions: LoadResource, SizeofResource, and LockResource (see figure 35).

The executable creates a file called “PSEXESVC.exe” in the ADMIN$ share on the remote machine:

The above file is populated using the _fwrite function (see figure below) . The hash of the file is 6A6A9AA6ED43EB3F857392459C7B05A5A0DF89E00A3214D333949A561BCFF368 and we’ll describe its purpose in the upcoming paragraphs.

The binary retrieves a handle to the standard output device using GetStdHandle (0xFFFFFFF5 = STD_OUTPUT_HANDLE):

GetConsoleScreenBufferInfo is utilized to obtain information about the console screen buffer:

The next action of PsExec is to start the PSEXESVC service on the remote host, as highlighted below:

The binary establishes a connection to the service control manager on the remote machine by calling the OpenSCManagerW routine (0xF003F = SC_MANAGER_ALL_ACCESS):

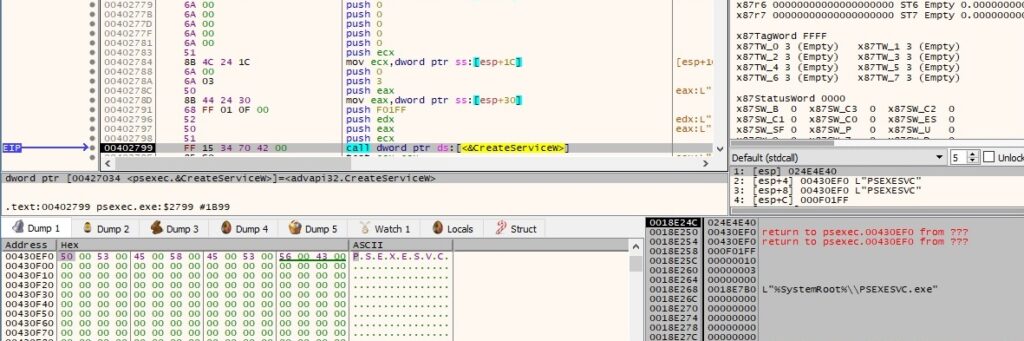
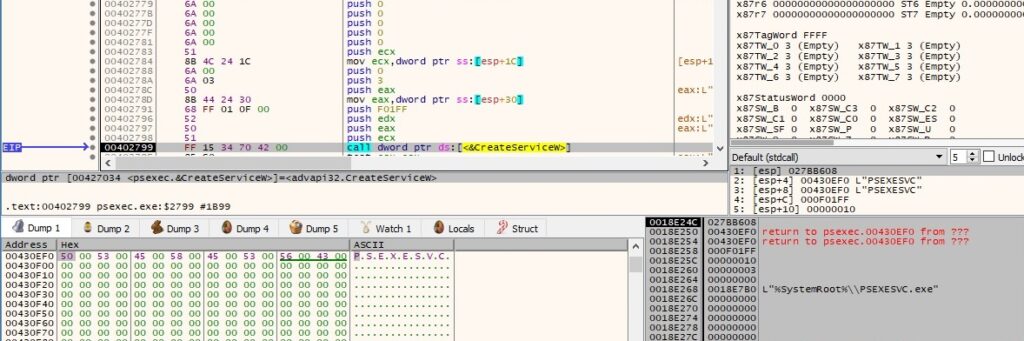
A new service called “PSEXESVC” is created by the process on the remote host (0xF01FF = SERVICE_ALL_ACCESS, 0x10 = SERVICE_WIN32_OWN_PROCESS, 0x3 = SERVICE_DEMAND_START):
The number of milliseconds that have elapsed since the system was started is extracted via a function call to GetTickCount:

The executable opens the newly created service using OpenServiceW (0xF01FF = SERVICE_ALL_ACCESS):

The “PSEXESVC” service is started using the StartServiceW routine:

The file retrieves the current status of the above service by calling the QueryServiceStatus API:

The next step of the execution flow is connecting with the PsExec service on the remote computer:

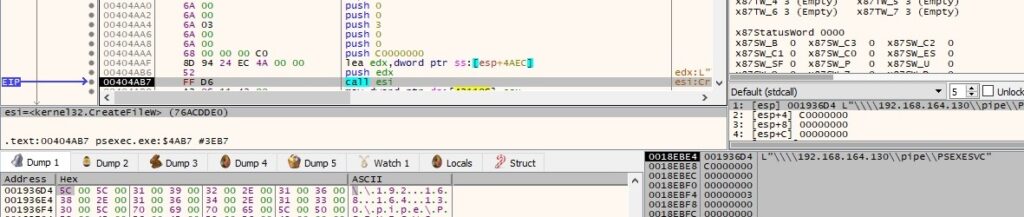
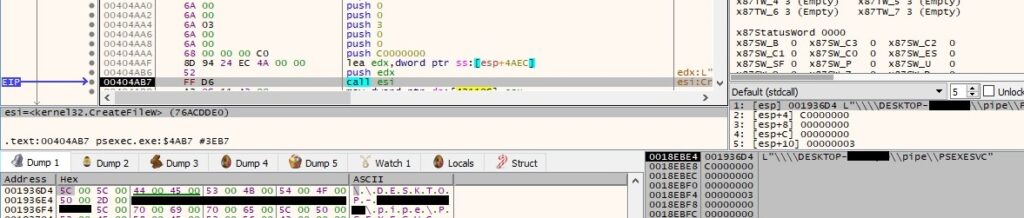
The PsExec executables opens the “\pipe\PSEXESVC” pipe from the remote machine (0xC0000000 = GENERIC_READ | GENERIC_WRITE, 0x3 = OPEN_EXISTING):
The pipe mode is modified by calling the SetNamedPipeHandleState API (0x2 = PIPE_READMODE_MESSAGE):

Interestingly, there are some indirect calls (jmp instructions instead of call instructions) that appear in the code. For example, the RtlInitUnicodeString function is used to initialize the “\Device\LanmanRedirector\<Computer name\IP Address>\ipc$” Unicode string:

The file opens the “\\192.168.164.130\ipc$” share using NtOpenFile (0x100001 = FILE_READ_DATA | SYNCHRONIZE, 0x1 = FILE_SHARE_READ, 0x90 = FILE_SYNCHRONOUS_IO_ALERT | FILE_CREATE_TREE_CONNECTION):

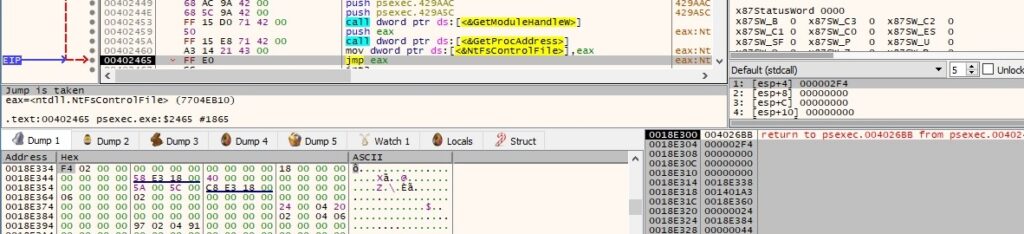
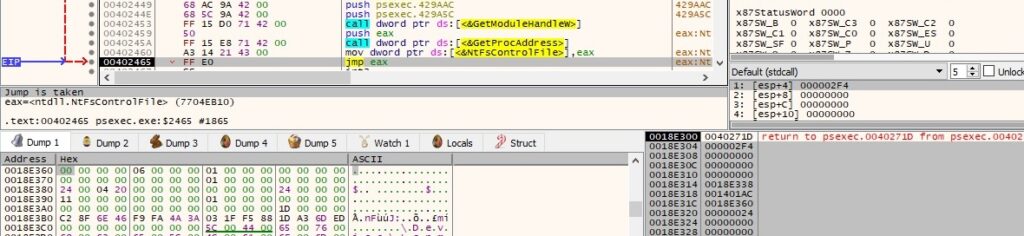
PsExec obtains connection information by calling the NtFsControlFile function with a specific control code 0x1401a3 = FSCTL_NETWORK_GET_CONNECTION_INFO:
There is a second call to NtFsControlFile that sends another control code 0x1401AC = FSCTL_NETWORK_DELETE_CONNECTION:
The major and minor version numbers of the OS are retrieved using the GetVersion API:

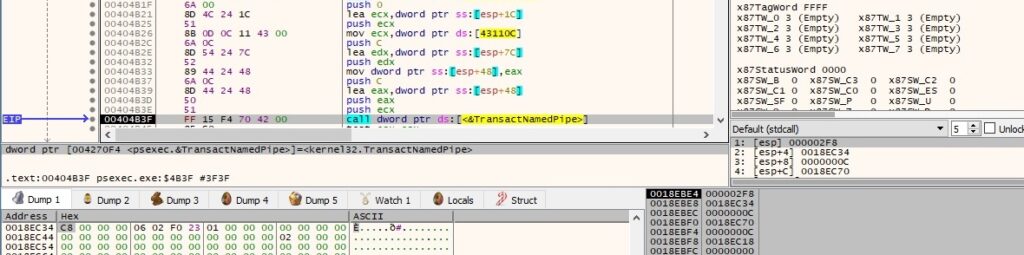
The information extracted above is written to the “\pipe\PSEXESVC” pipe by calling TransactNamedPipe:
The binary acquires a handle to a key container within a particular CSP (cryptographic service provider) via a call to CryptAcquireContextW (0x18 = PROV_RSA_AES):

CryptCreateHash is utilized to create a hash object (0x8004 = CALG_SHA1):

The executable hashes a buffer that contains 16 bytes (probably generated based on the GetTickCount call) and the “Sysinternals Rocks” string:

An AES256 key is derived from the SHA1 hash using CryptDeriveKey (0x6610 = CALG_AES_256):

The process identifier is obtained via a function call to GetCurrentProcessId:

An event object called “Global\PSEXESVC-<Computer Name\IP address>-<Process ID>” is created:

PsExec displays a message that states the process name passed as a parameter is going to be started on the remote host:

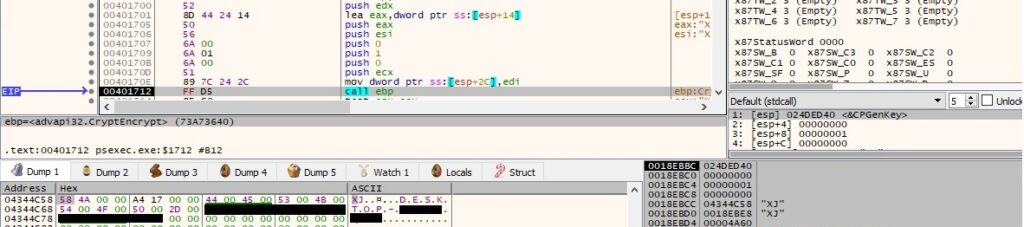
A buffer that contains the following information is encrypted using the AES256 algorithm (figure 63): size of the buffer – 8, process ID in hex, local computer name, and the process that will be spawned.
The encrypted buffer size and the encrypted buffer are written to the “\\192.168.164.130\pipe\PSEXESVC” pipe:


PsExec waits until an instance of the “\\192.168.164.130\pipe\PSEXESVC-<Local computer name>-<Process ID>-stdin” pipe is available for connection (see figure below). This pipe and the others that correspond to the standard output\error are created by the PSEXESVC process started on the remote host. The entire execution flow will be explained in the 2nd part of the blog post, when we’ll also analyze the execution of that process.

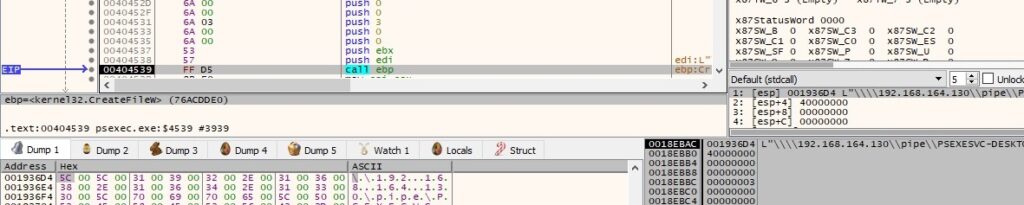
The executable opens the above named pipe using CreateFileW (0x40000000 = GENERIC_WRITE, 0x3 = OPEN_EXISTING):
A similar approach is applied to the “\\192.168.164.130\pipe\PSEXESVC-<Local computer name>-<Process ID>-stdout” and “\\192.168.164.130\pipe\PSEXESVC-<Local computer name>-<Process ID>-stderr” pipes, with only one notable different – the requested access is 0x80000000 (GENERIC_READ).
The binary retrieves a pseudo handle for the current process via a call to GetCurrentProcess:

A new thread is created by the process. Please note that the starting address of the thread is different than the actual relevant function, which is sub_404240 in this case (0x4 = CREATE_SUSPENDED):

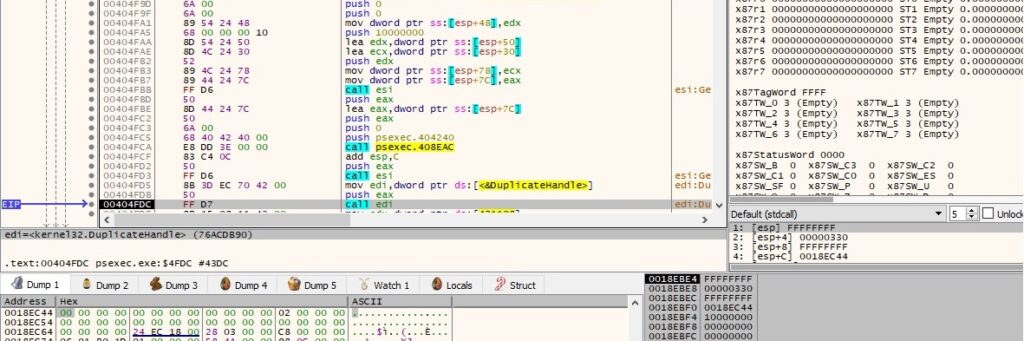
The thread handle is duplicated using DuplicateHandle (0x10000000 = GENERIC_ALL):
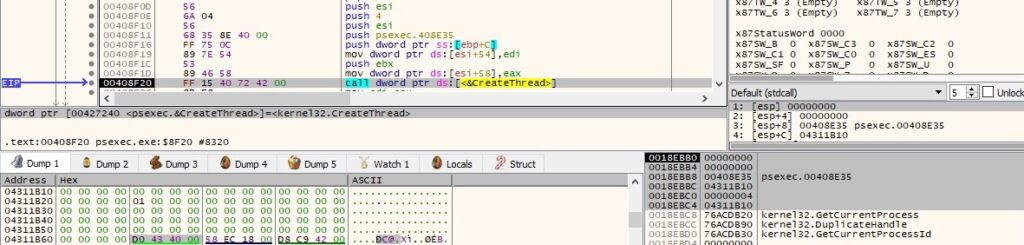
The CreateThread API is used to create two threads that will eventually execute the sub_4043D0 and sub_404190 functions (0x4 = CREATE_SUSPENDED):

The PsExec executable changes the title for the console window using SetConsoleTitleW:

The binary performs a call to WaitForMultipleObjects in order to suspend the process until the above threads finish and the event object created above is in the signaled state:

Thread activity – sub_404190 (handling the standard input)
The thread obtains a handle to the standard input device by calling the GetStdHandle routine (0xFFFFFFF6 = STD_INPUT_HANDLE):

PsExec checks whether the event object is in the signaled state via a function call to WaitForSingleObject:

The executable reads a character from the console input buffer using the ReadConsoleW function:

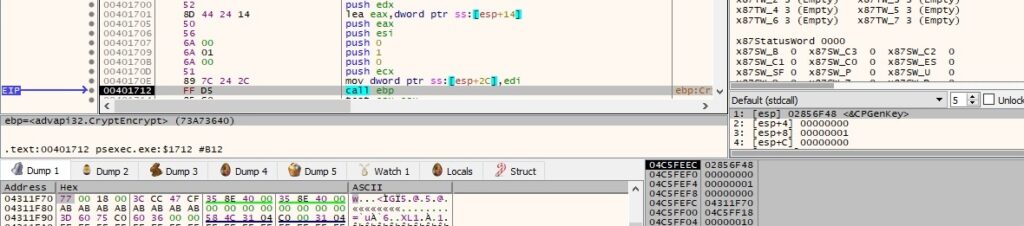
Our objective is to run the “whoami” command in the command prompt. As we can see below, the process encrypts the command byte-by-byte using the AES algorithm:
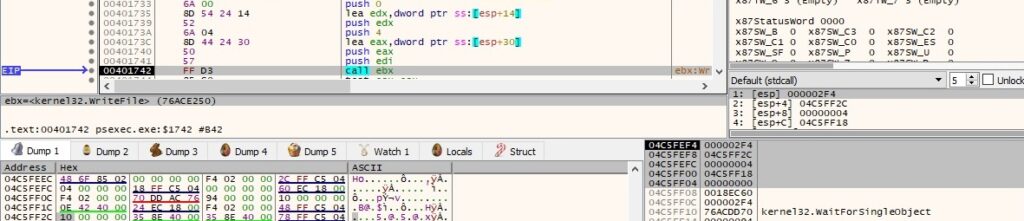
The length of the encrypted data and then the actual data from above are written to the “\\192.168.164.130\pipe\PSEXESVC-<Local computer name>-<Process ID>-stdin” pipe:

The server end of the above pipe instance is disconnected from the process using DisconnectNamedPipe:

Thread activity – sub_4043D0 (handling the standard error)
The thread reads 4 bytes from the “\\192.168.164.130\pipe\PSEXESVC-<Local computer name>-<Process ID>-stderr” pipe:

The server end of the above pipe instance is disconnected from the process using DisconnectNamedPipe:

Thread activity – sub_404240 (handling the standard output)
The thread reads 4 bytes from the “\\192.168.164.130\pipe\PSEXESVC-<Local computer name>-<Process ID>-stdout” pipe:

The ReadFile API is utilized to read encrypted data from the above pipe:

The buffer is decrypted using the AES algorithm via a call to CryptDecrypt:


MultiByteToWideChar is used to map character strings to UTF-16 (wide character) strings:

The process retrieves a handle to the standard output device using GetStdHandle (0xFFFFFFF5 = STD_OUTPUT_HANDLE):

The buffer that was decrypted above is written to the standard output via a call to WriteFile:
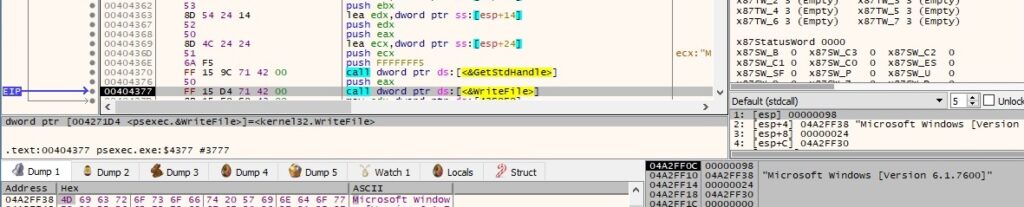
Figure 91 reveals that we get a shell on the remote machine using the above method:

We continue with the analysis of the main thread.
The PsExec process sets the event object to the signaled state using SetEvent:

There is a second call to WaitForMultipleObjects that suspends the process until two of the above threads finish:

The process reads 4 bytes from the “\\192.168.164.130\pipe\PSEXESVC” pipe:

In the case of successful command execution, the remote PSEXESVC.exe process sends the result through the above pipe (in this case, the username).
In the case of an error, the binary retrieves the thread’s last-error code value using the GetLastError API:

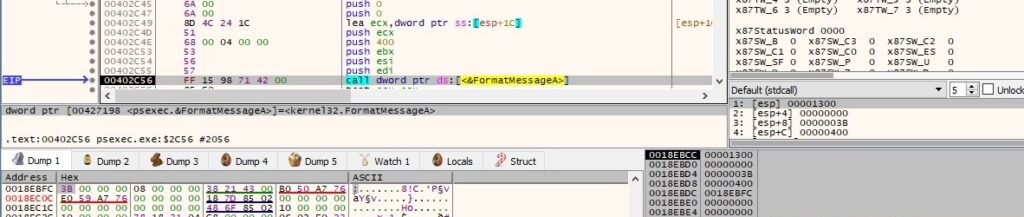
The error message is formatted by calling the FormatMessageA routine (0x1300 = FORMAT_MESSAGE_FROM_SYSTEM | FORMAT_MESSAGE_IGNORE_INSERTS | FORMAT_MESSAGE_ALLOCATE_BUFFER, 0x3B = ERROR_UNEXP_NET_ERR, 0x400 = LANG_USER_DEFAULT):
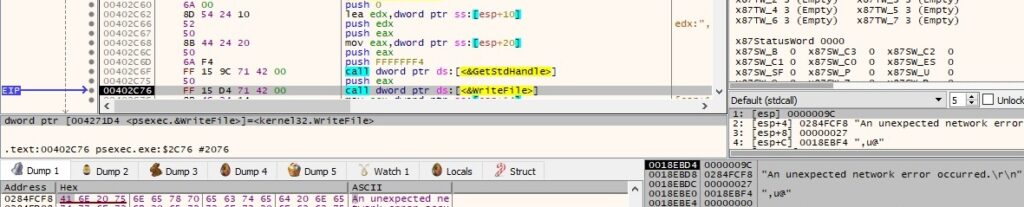
The error message is written to the standard output:

The WNetCancelConnection2W API is utilized to cancel the existing network connection:

Second process: psexec.exe -c -f -s win.exe
We’ll only highlight the differences between running PsExec on the local machine and the first case.
The process retrieves the content of the %PATH% environment variable by calling the GetEnvironmentVariableW function:

GetFileAttributesW is used to obtain file system attributes for the specified file:

An intermediary message that gives details about what action will occur next is displayed:

The binary initializes the use of the Winsock DLL using the WSAStartup routine:

The gethostname function is utilized to extract the standard host name for the local machine:

PsExec retrieves host information corresponding to the local host:

The local IP address in hex is converted into an ASCII string in dotted-decimal format:

The executable extracts the path of the System directory via a function call to GetSystemDirectoryW:

The same workflow of extracting the PSEXESVC resource as in the first case is repeated. However, this time the parameter is C:\Windows\PSEXESVC.exe, which is created and populated using _wfopen and _fwrite:

The process obtains a handle to the standard output device using GetStdHandle (0xFFFFFFF5 = STD_OUTPUT_HANDLE):

GetConsoleScreenBufferInfo is used to retrieve information about the console screen buffer:

The next step of the process is to start the PSEXESVC service on the local machine, as highlighted below:

The OpenSCManagerW API is utilized to establish a connection to the service control manager on the local computer (0xF003F = SC_MANAGER_ALL_ACCESS):

A new service called “PSEXESVC” is created on the local host (0xF01FF = SERVICE_ALL_ACCESS, 0x10 = SERVICE_WIN32_OWN_PROCESS, 0x3 = SERVICE_DEMAND_START):
The PsExec process starts the new service by calling the StartServiceW API:

The QueryServiceStatus routine is used to obtain the current status of the above service:

The process prints the next step in the command line prompt:

The binary opens the “\pipe\PSEXESVC” pipe from the local machine via a function call to CreateFileW (0xC0000000 = GENERIC_READ | GENERIC_WRITE, 0x3 = OPEN_EXISTING):
Due to the fact that “-c” was passed as a parameter, the next step is copying the file specified as a parameter to the local host:

The file is copied to the ADMIN$ share using CopyFileW:

The PsExec process will execute the binary from above, as described in figure 120.

We’re going to describe the activity of the PSEXESVC.exe process that was started earlier. The only difference between this case and the first one is that the process is running on the local machine instead of the remote host.
The PSEXESVC.exe process reads data from the “\pipe\PSEXESVC” pipe via a function call to ReadFile:

The file decrypts the encrypted data using CryptDecrypt (see figure 122). The encryption algorithm is AES256, and the key is derived based on the same approach as in the first case.

The resulting buffer contains the size of the buffer – 8, PsExec process ID in hex, local computer name, and the file that will be executed:

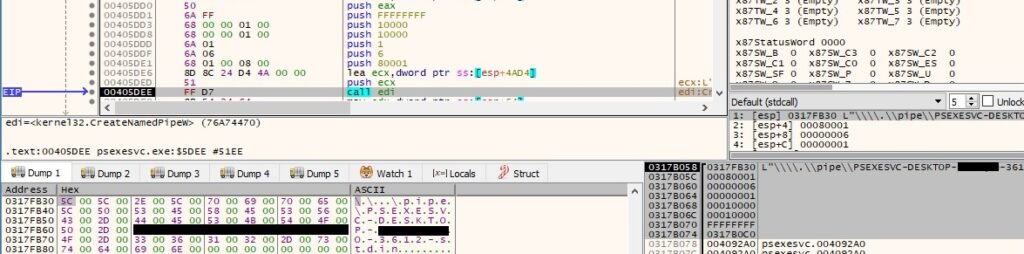
PSEXESVC.exe creates 3 named pipes called “\\.\pipe\PSEXESVC-<Local computer name>-<PSEXESVC Process ID>-stdin\stdout\stderr” using the CreateNamedPipeW function (0x80001 = FILE_FLAG_FIRST_PIPE_INSTANCE | PIPE_ACCESS_INBOUND, 0x6 = PIPE_TYPE_MESSAGE | PIPE_READMODE_MESSAGE):
ConnectNamedPipe is used to enable the named pipe server process (PSEXESVC) to wait for a client process (psexec.exe) to connect to the pipes:

The OpenProcessToken function opens the access token associated with the current process (0xB = TOKEN_QUERY | TOKEN_DUPLICATE | TOKEN_ASSIGN_PRIMARY):

The binary creates a new access token that duplicates the above token by calling the DuplicateTokenEx routine (0x2000000 = MAXIMUM_ALLOWED, 0x1 = TokenPrimary):

The Wow64DisableWow64FsRedirection API is utilized to disable file system redirection for the current thread:

The process forces the system not to display the critical-error-handler messages via a call to SetErrorMode (0x1 = SEM_FAILCRITICALERRORS):

The CreatePipe function is repeatedly used to create three anonymous pipes:

The write handles’ properties are modified using SetHandleInformation (0x1 = HANDLE_FLAG_INHERIT):

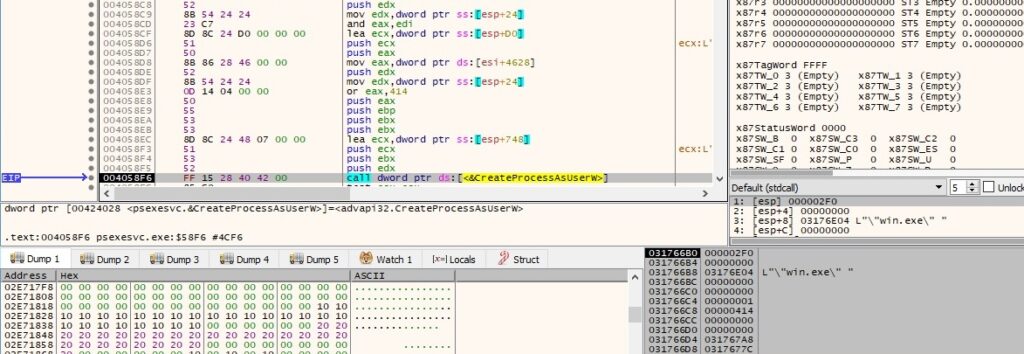
The PSEXESVC process executes the file passed through the named pipe using the CreateProcessAsUserW API (0x414 = CREATE_UNICODE_ENVIRONMENT | CREATE_NEW_CONSOLE | CREATE_SUSPENDED):
The execution of the above thread is resumed via a function call to ResumeThread. As in the first case, the process creates three similar threads, and their execution will not be detailed again: sub_404B90, sub_404AD0, and sub_404D10.
PsExec writes the confirmation that the new process was successfully started (including the process ID) and then waits for the process to finish:

The “PSEXESVC” service is stopped by calling the ControlService API (0x1 = SERVICE_CONTROL_STOP):

The executable deletes the “PSEXESVC” service via a call to DeleteService:

DeleteFileW is used to delete the PSEXESVC.exe file created earlier:

References
MSDN: https://docs.microsoft.com/en-us/windows/win32/api/
PsExec: https://docs.microsoft.com/en-us/sysinternals/downloads/psexec
I did a similar analysis few years back. The goal was to develop an application that can execute other GUI application on the same computer, in the same session, but under different user account.
Basically re-create “runas” command and integrate it into our GUI application.
Learned hella lot of about pipes, integrity levels, DACLs, SACLs, services, service manager, SIDs, session SIDs, tokens, privileges, impersonation and-what-nots.
Thanks for the detailed information about PsExec. Wealth of information for Threat Hunters to thrive upon to create detections!
Great job.